HTML
A static web page is a page which must be modified by the page developer. For example, this site is a static page. Static pages are generally boring, but they are a necessary step to get into the fun stuff – dynamic pages. In this chapter, you will learn to write HTML documents.
Getting started
Open your favorite editor and create a new HTML file. If the editor is nice to you, it will automatically create a template for you. If not, here is one:
<!DOCTYPE html>
<html>
    <head>
        <meta charset='utf-8'>
        <title>Page Title</title>
    </head>
    <body>
    </body>
</html>
This is a minimal valid HTML document. Notice that the elements are hierarchically organized. The
element title is contained inside the element head, which is contained inside the element
html. The whitespace is mostly ignored in HTML, so the elements can be indented as they are nested
(the indentation is not required, it just improves readability).
Task – Basics
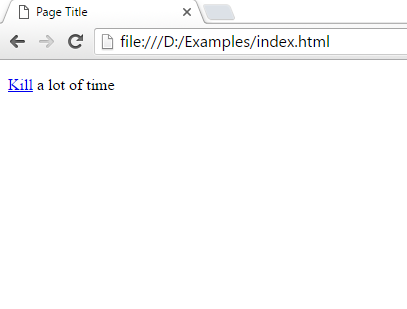
Add a paragraph inside the body element. The paragraph text should be “Kill a lot of time”, the word “Kill” should
be a link to https://www.youtube.com.
<!DOCTYPE html>
<html>
    <head>
        <meta charset='utf-8'>
        <title>Page Title</title>
    </head>
    <body>
        <p><a href='https://www.youtube.com'>Kill</a> a lot of time</p>
    </body>
</html>
Open the page in your editor preview or in your favorite web browser and you should see an output similar to this.
There is no need to upload the page to a web site, since the page is static (static pages are boring, but easy). However, nobody else can view your page for now.
Task – Examine HTML
Open the web browser Developer Tools and examine the structure of the HTML page. Can you see that elements are organized hierarchically? Can you spot attributes?
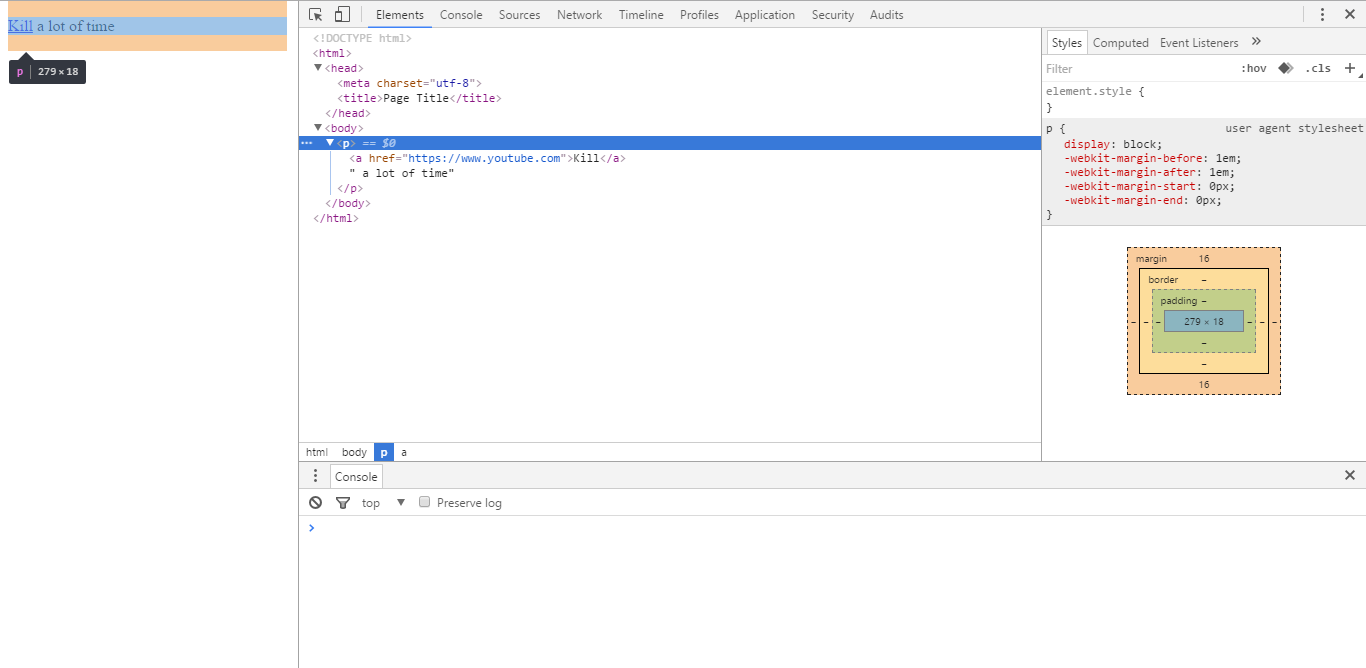
There is attribute `charset` in element `meta`, the attribute has value `utf8`. Then there
is attribute `href` which you have written yourselves.
Task – Tables
The following additional rules apply to creating tables:
- everything in a table must be in a table cell
- a table cell must be in a table row
- a table row must be in a table
Create a table like this in HTML:
| First | Second | Third |
|---|---|---|
| a | b | c |
| quick | brown | fox |
<!DOCTYPE html>
<html>
    <head>
        <meta charset='utf-8'>
        <title>Table introduction</title>
    </head>
    <body>
        <table>
            <tr>
                <th>First</th>
                <th>Second</th>
                <th>Third</th>
            </tr>
            <tr>
                <td>a</td>
                <td>b</td>
                <td>c</td>
            </tr>
            <tr>
                <td>quick</td>
                <td>brown</td>
                <td>fox</td>
            </tr>
        </table>
    </body>
</html>
Task – Playing with task cells 1
It is sometimes necessary to have tables with joined cells. To join table cells, use
the attributes colspan (span a cell over columns) and rowspan (span a cell over rows).
The value of the attribute is the number of cells the joined cells should occupy.
Tip: use the attribute border on table to get a clear view of table cells. Allowed attribute values are
0 (no borders), 1 (borders).
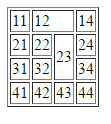
Given this table:
<!DOCTYPE html>
<html>
<head>
<meta charset='utf-8'>
<title>Merging cells in tables</title>
</head>
<body>
<table border='1'>
<tr>
<td>11</td>
<td>12</td>
<td>13</td>
<td>14</td>
</tr>
<tr>
<td>21</td>
<td>22</td>
<td>23</td>
<td>24</td>
</tr>
<tr>
<td>31</td>
<td>32</td>
<td>33</td>
<td>34</td>
</tr>
<tr>
<td>41</td>
<td>42</td>
<td>43</td>
<td>44</td>
</tr>
</table>
</body>
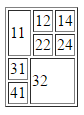
</html>Join the two cells 12 and 13. Then join the cells 23 and 33. To achieve a table like this:
<!DOCTYPE html>
<html>
    <head>
        <meta charset='utf-8'>
        <title>Merging cells in tables</title>
    </head>
    <body>
    <table border='1'>
        <tr>
            <td>11</td>
            <td colspan='2'>12</td>
            <td>14</td>
        </tr>
        <tr>
            <td>21</td>
            <td>22</td>
            <td rowspan='2'>23</td>
            <td>24</td>
        </tr>
        <tr>
            <td>31</td>
            <td>32</td>
            <td>34</td>
        </tr>
        <tr>
            <td>41</td>
            <td>42</td>
            <td>43</td>
            <td>44</td>
        </tr>
    </table>
    </body>
</html>
Notice that you have to delete the appropriate cells, because the table now contains less cells than before. This might become very confusing when looking on a large HTML table, because it may be missing some columns – in the example above, the third row seems to have only three columns.
Task – Playing with table cells 2
Now as an exercise, create a table like this:
<!DOCTYPE html>
<html>
    <head>
        <meta charset='utf-8'>
        <title>Merging cells in tables</title>
    </head>
    <body>
    <table border='1'>
        <tr>
            <td colspan='2' rowspan='2'>11</td>
            <td>12</td>
            <td>14</td>
        </tr>
        <tr>
            <td>22</td>
            <td>24</td>
        </tr>
        <tr>
            <td>31</td>
            <td colspan='3' rowspan='2'>32</td>
        </tr>
        <tr>
            <td>41</td>
        </tr>
    </table>
    </body>
</html>
You probably noticed that your HTML code becomes more and more complicated. A good practice is to maintain
indentation of code. A good editor can help you – it can automatically indents code and highlight matching pairs
of tags. Another thing to remember is that you cannot just mix random tags (e.g. a <tr> has to be inside
a <table> and nothing else should). Inexperienced HTML coders sometimes end up with nasty code which renders
OK (in some browsers) but it is very far from any standards. Always check your code with a validator.
Task – Lists
There are two types of lists – ordered lists (numbered) and
un-ordered lists (enumerations). They behave the same way and they can be mixed together. The
basic rule, that applies for lists is that everything contained in a list must be inside
in li elements.
Create an ordered list with 3 items:
- Good
- Bad
- Ugly
<!DOCTYPE html>
<html>
    <head>
        <meta charset='utf-8'>
        <title>Lists</title>
    </head>
    <body>
        <ol>
            <li>Good</li>
            <li>Bad</li>
            <li>Ugly</li>
        </ol>
    </body>
</html>
Task – Lists 2
Now try to create a nested list like this (remember that everything in a list must
be inside an li element):
- Good
- empire
- magazine
- time
- Bad
- day
- ice cream
- Schandau
- Ugly
- gifs
<!DOCTYPE html>
<html>
    <head>
        <meta charset='utf-8'>
        <title>Nested lists</title>
    </head>
    <body>
        <ol>
            <li>Good
                <ul>
                    <li>empire</li>
                    <li>magazine</li>
                    <li>time</li>
                </ul>
            </li>
            <li>Bad
                <ul>
                    <li>day</li>
                    <li>ice cream</li>
                    <li>Schandau</li>
                </ul>
            </li>
            <li>Ugly
                <ul>
                    <li>gifs</li>
                </ul>
            </li>
        </ol>
    </body>
</html>
Putting it all together
HTML elements may be nested and combined. Now try to create an entire page like this:
I used:
- The text from Wikipedia article at https://en.wikipedia.org/wiki/John_Doe
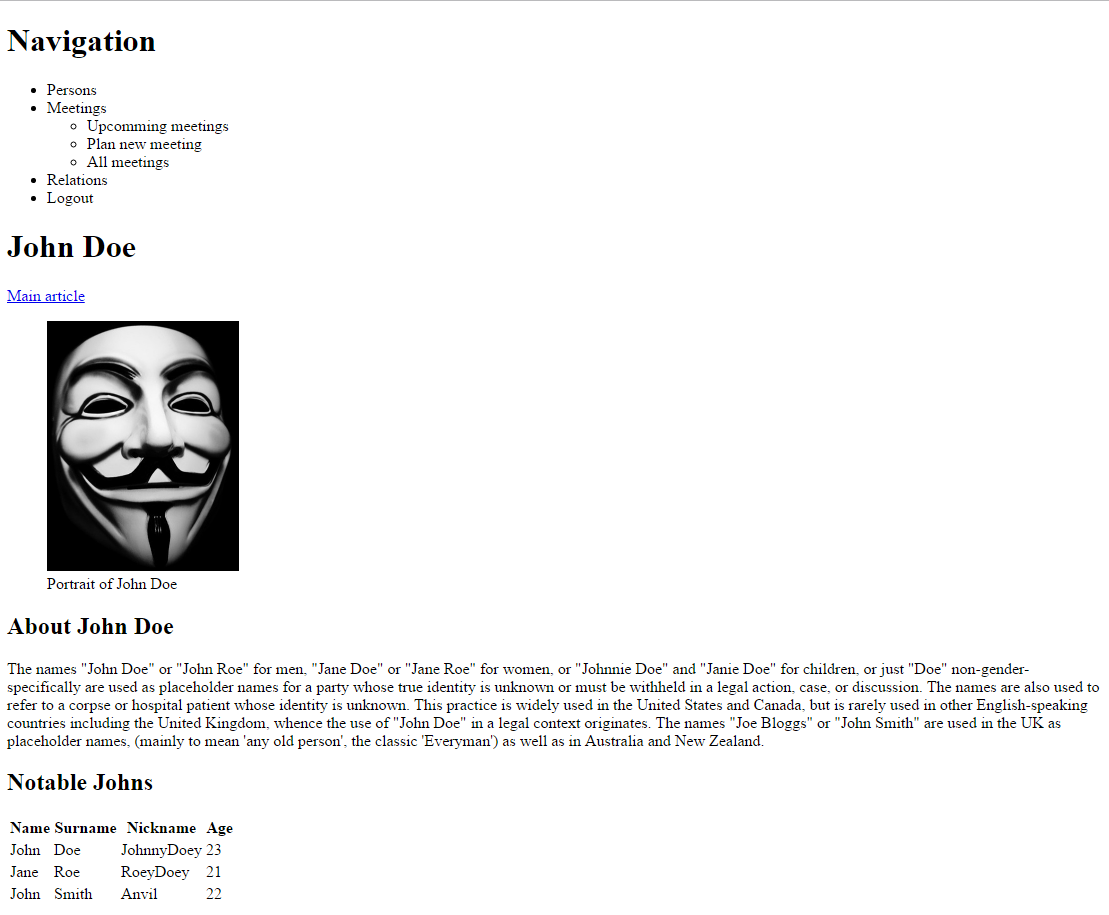
- The Image from https://www.lifeofthepartystore.com/guy-fawkes-mask/
- The HTML elements:
h1,h2,table,ul,src,a,nav(as a container for navigation)
<!DOCTYPE html>
<html>
    <head>
        <meta charset='utf-8'>
        <title>Sample page</title>
    </head>
    <body>
        <h1>Navigation</h1>
        <nav>
            <ul>
                <li>Persons</li>
                <li>Meetings
                    <ul>
                        <li>Upcomming meetings</li>
                        <li>Plan new meeting</li>
                        <li>All meetings</li>
                    </ul>
                </li>
                <li>Relations</li>
                <li>Logout</li>
            </ul>
        </nav>

        <h1>John Doe</h1>
        <p><a href='https://en.wikipedia.org/wiki/John_Doe'>Main article</a>
        </p>
        <figure>
            <img src='http://www.johndoe.pro/img/John_Doe.jpg' alt='Portrait of John Doe' height='250'>
            <figcaption>Portrait of John Doe</figcaption>
        </figure>

        <h2>About John Doe</h2>
        <p>The names "John Doe" or "John Roe" for men, "Jane Doe" or "Jane Roe" for women, or "Johnnie Doe" and "Janie Doe" for children, or just "Doe" non-gender-specifically are used as placeholder names for a party whose true identity is unknown or must be withheld in a legal action, case, or discussion. The names are also used to refer to a corpse or hospital patient whose identity is unknown. This practice is widely used in the United States and Canada, but is rarely used in other English-speaking countries including the United Kingdom, whence the use of "John Doe" in a legal context originates. The names "Joe Bloggs" or "John Smith" are used in the UK as placeholder names, (mainly to mean 'any old person', the classic 'Everyman') as well as in Australia and New Zealand.
        </p>

        <h2>Notable Johns</h2>
        <table>
            <tr>
                <th>Name</th>
                <th>Surname</th>
                <th>Nickname</th>
                <th>Age</th>
            </tr>
            <tr>
                <td>John</td>
                <td>Doe</td>
                <td>JohnnyDoey</td>
                <td>23</td>
            </tr>
            <tr>
                <td>Jane</td>
                <td>Roe</td>
                <td>RoeyDoey</td>
                <td>21</td>
            </tr>
            <tr>
                <td>John</td>
                <td>Smith</td>
                <td>Anvil</td>
                <td>22</td>
            </tr>
        </table>
    </body>
</html>
Note that the img element does not have any content (content is defined by the src attribute)
so it is written with just the start tag <img src='...'>. This can get a
lot more complicated.
The page does not look like the nice best page in the world, but it will get much better, once you
get to layout and styles because the HTML language does not have the means to format and
style a document. Do not attempt to style a web page using the HTML language.
E.g. never use a second h2 or third level h3 heading instead of the first level heading
h` just to get a smaller font size. The structure of the document must be used irrespective of
the looks of the document. Adjusting the font size and many other things is done through
Style Sheets, which we will get to later.
Publishing your page
A webpage needs to be placed on a web server. That is a computer which is constantly connected to the Internet and waits for HTTP requests which are served by special software. This computer has usually a hostname (something like www.myawesomepage.com) so you and others do not have to remember the IP address of that machine. Other people (visitors) can connect to that computer and download your page and referenced files (images and other stuff) using their browser software (not always same as yours) after you upload it – always remember to upload new versions of your files. You can usually upload your page using an FTP client or SSH client.
You definitely noticed that web servers return some default page when you visit them (you do not have to write
filename into your browser’s address bar - www.myawesomepage.com/file.html). Such behavior is achieved by naming
convention - that default file is usually named index.html or index.php.
Important note is that server is another computer which usually runs some Linux OS. This means that absolute paths are different and case sensitive - when creating a web page locally on your PC, use relative paths and be precise with case of letters in them.
Summary
Now you should be able to describe the structure of any text document using the HTML language. The document is still formatted poorly, we will get to that later. The documents you produce now are formated with some default formats build into your web browser. Do not worry, that you might not be able to create complex pages right now, you need to know the principles and be able to create simple pages.
New Concepts and Terms
- HTML tables
- HTML lists
Control question
- What is the correct minimal content of HTML5 file?
- What encoding do we use in HTML files nowadays?
- Is static HTML file a web application?