Slim Introduction
In the previous parts, you have learned how to work with HTML forms and the basics of the PHP language. Using plain PHP to create an entire application is quite tedious and requires that you take care in organizing your source code. That is particularly difficult if you don’t have the experience yet. If you don’t organize your application code (or any work actually) it quickly becomes an unmaintainable mess which no one (including you) can understand.
A common solution to this is to use a framework. A framework serves two purposes, first it takes care of some common (and repetitive) tasks and second it guides the organization of the application code. This has both advantages and disadvantages. The main disadvantage is that you have to learn yet another thing to work with (because you need to know both plain PHP and also some PHP framework). A minor disadvantage is that every framework is somehow limiting the possibilities of plain PHP, so when you try to do something very special it might prove difficult to do.
The main advantage of a framework is that it leads you in doing things The Correct Way™. There is usually a much smaller margin for errors and once you get used to the framework, the development of the application is much faster. That means you can create the final application in shorter time. That means that in a given amount of time, you can create a better application. (If you still want to do it the hard way, that is a walkthrough for that too.)
For this book I chose the Slim framework. That choice is rather arbitrary, because there are plenty of other good frameworks (Laravel, Symfony, Nette, Yii, …). The main reason is that it is very small and therefore it is easy to learn and start with. Although it does not offer as many features as other frameworks. The framework can easily be extended and even though it is small, you can do great stuff with it.
Getting Started
Before you start, you need to have the Composer installed. I recommend that you make yourself familiar with the other tools as well (Git, IDE). You can start with plain Slim framework using the official Skeleton. However, to make your life easier I have prepared my own skeleton. My own Skeleton contains added support for HTML templates and PDO database connections). You can either fork the repository (recommended) or download it manually.
Fork the Repository
This approach is recommended if you want to use Git to version your source code. Before you start this approach, you need to have Git installed. Forking a repository means that you create your own repository copy in which you can do anything you want.
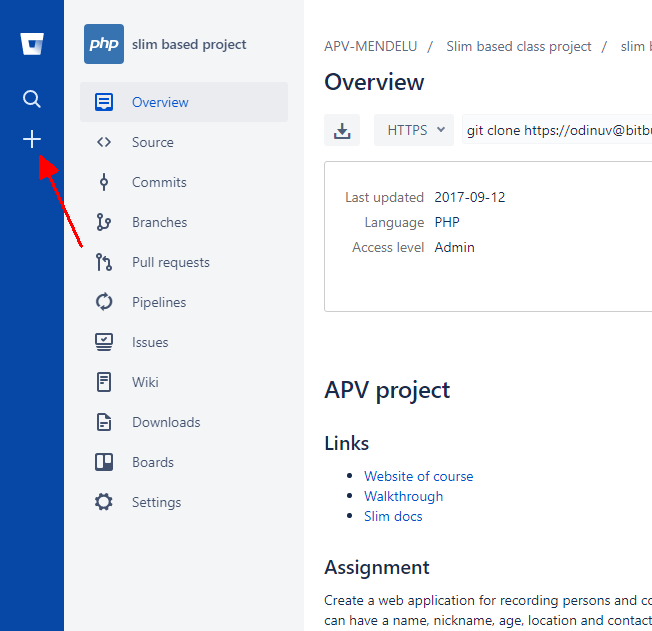
Go to the Slim Project page (https://bitbucket.org/apvmendelu/slim-based-project) and login with a Bitbucket account. When you login, you should see a plus button on the left:
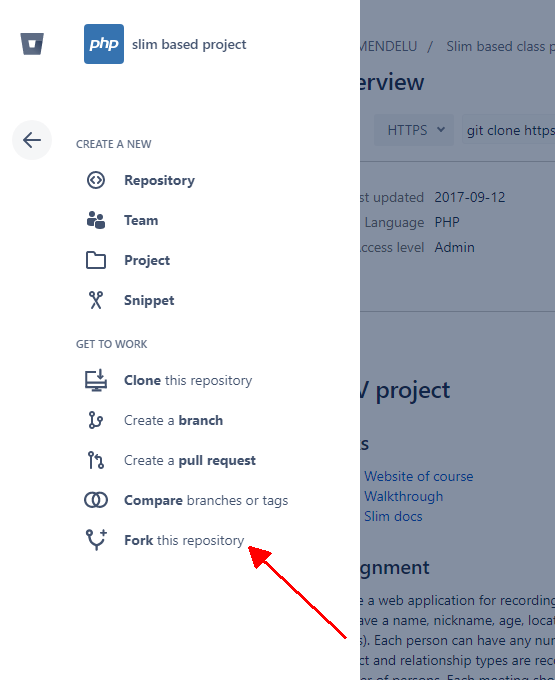
Select Fork this repository:
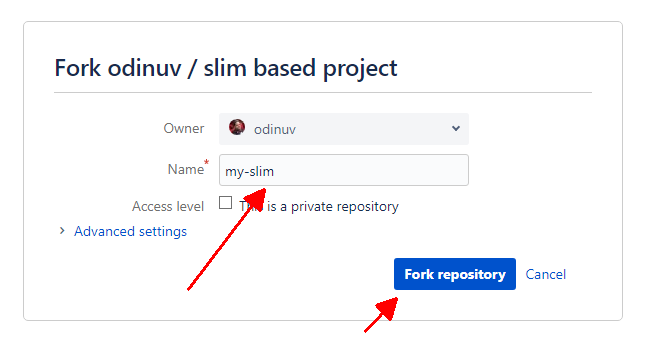
Name your application repository:
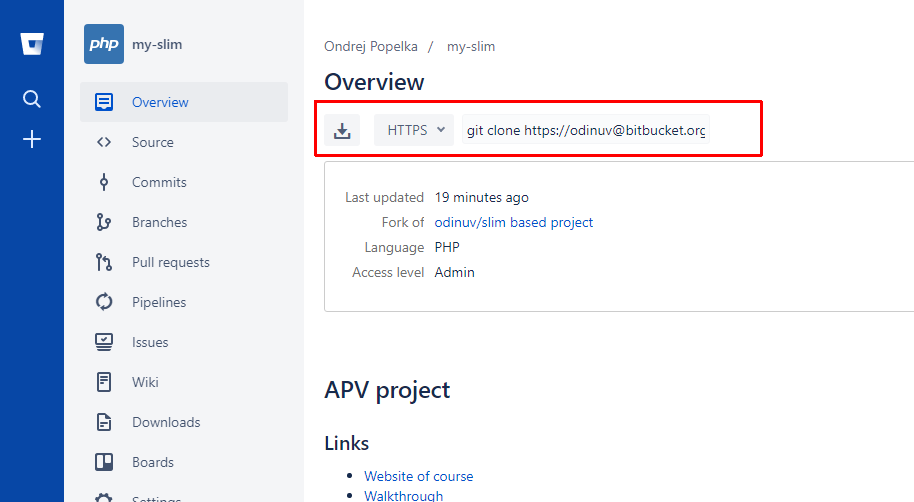
Wait a little while and you should be redirected to your own repository which contains the slim
project skeleton. Note the command for cloning the repository, e.g. git clone https://odinuv@bitbucket.org/odinuv/my-slim.git.
Run this above command from a command line or use your favorite Git client and a local copy of your git repository will be created in the selected directory.
Downloading Manually
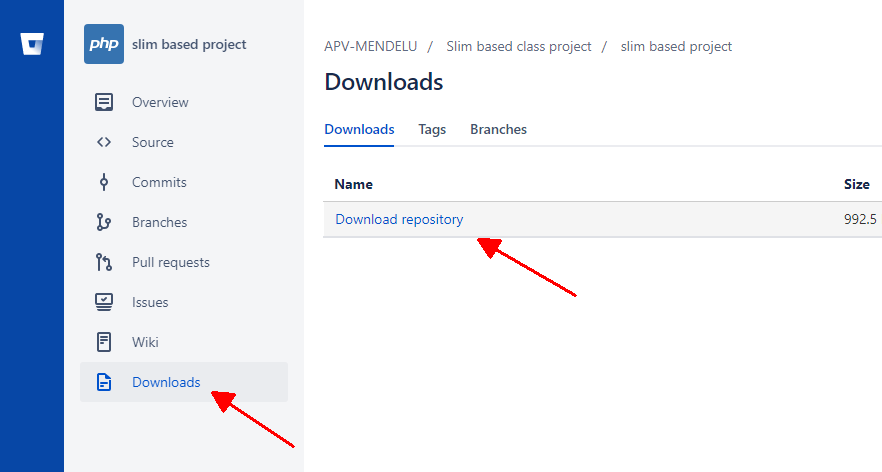
If you are unable to fork the repository, you can download the project manually. Go to the Slim Project page and download the entire repository.
Unzip the archive into a directory you wish to work in. Even if you make a manual copy of the repository this way, I still highly recommend that you use git to track changes in your application.
Project Structure
If you followed one of the previous paths, you should have a directory on your computer
with a project skeleton. Navigate into that directory and execute the
command composer update via command line. You should see an output similar to this:
> composer update
Loading composer repositories with package information
Updating dependencies (including require-dev)
Package operations: 11 installs, 0 updates, 0 removals
- Installing vlucas/phpdotenv (v2.4.0): Loading from cache
- Installing latte/latte (v2.4.6): Loading from cache
- Installing psr/http-message (1.0.1): Loading from cache
- Installing ujpef/latte-view (0.0.2): Loading from cache
- Installing psr/container (1.0.0): Loading from cache
- Installing container-interop/container-interop (1.2.0): Loading from cache
- Installing nikic/fast-route (v1.2.0): Loading from cache
- Installing pimple/pimple (v3.2.2): Loading from cache
- Installing slim/slim (3.8.1): Loading from cache
- Installing psr/log (1.0.2): Loading from cache
- Installing monolog/monolog (1.23.0): Loading from cache
Generating autoload files
When the command finishes, the project directory should contain the following contents:
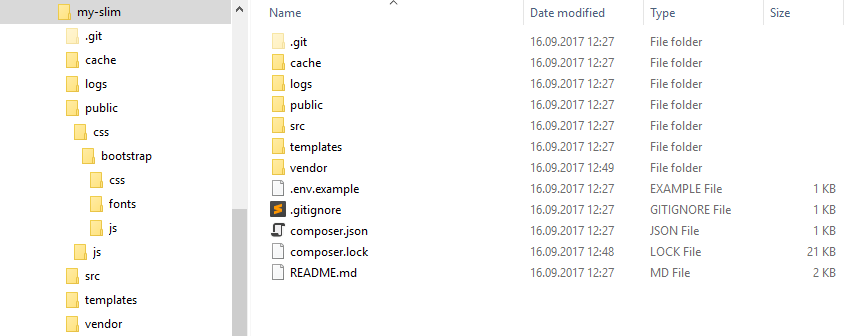
The project directory (root) contains the following directories and files:
- .git — a hidden directory with the git repository (not present if you downloaded the project manually), do not touch this directory.
- cache — a directory used for a template cache, no need to worry about this one now.
- logs — a directory for files with application messages, these will be useful when debugging the application.
- public — a directory with files accessible to the end-user of the application:
- css — a directory for Cascading Styles Sheets, includes Bootstrap.
- js — a directory containing Javascript files, includes jQuery.
- .htaccess — a hidden file used by Apache web server to route requests to
index.php. - index.php — an entry script of the Slim Framework, do not modify this file.
- src — the source code of the application, this is the directory, where most of your work will be done.
- dependencies.php — a script which initializes the application dependencies (dependency container), these currently include the Latte Template engine, PDO Database and Monolog Logger.
- middleware.php — a script which configures the Middleware of the Slim Framework. It is currently empty, but it will become useful when implementing an application login.
- routes.php — a script which defines routes — how an HTTP request is handled. This will be the most important script in the beginning.
- settings.php — a script which configures the Application Settings. There is no need to touch this file, the actual setting values are configured in the
.envfile (see below).
- templates — a directory for Latte Templates.
- index.latte — a sample template.
- layout.latte — a sample template layout.
- vendor — a directory containing 3rd party libraries required by your application. You should not modify anything in this directory (see Composer below for more information).
- .env.example — a sample configuration file, see below.
- .gitignore — a file for Git tool which defines what files are not included in the source code repository. Do not modify this file unless you understand it.
- README.md — an application readme file in Markdown format, do whatever you want with this file.
- composer.json — a file which lists 3rd party libraries required by your application (see Composer).
- composer.lock — a file which contains the description of installed 3rd party libraries (see Composer).
This is probably a lot of stuff in the beginning. So I want to drive your attention to the important parts. These are:
- The
srcdirectory and mainly theroutes.phpfile, which will contain most of your code. - The
templatesdirectory which contains the Latte Templates for HTML pages, I will get to this one when explaining templates. - The
.envfile which is used to configure your application (most importantly the database credentials), this will be important when using the database. - The
composertool and its stuff.
Composer
Composer is a package manager for PHP language. It manages 3rd party libraries for your application. Composer is not technically required to develop or run PHP applications, but it has become defacto industry standard, so you should have some idea how it works. Composer itself needs to be installed before you can use it (you should have it working by now). There are three important parts of the Composer settings for your application:
composer.json— a file in JSON format which contains the information about what libraries you require for your application.composer.lock— a file in JSON format which contains the actual installed versions of the libraries.vendor— a directory with the actual libraries.
There are two important commands in the Composer tool:
composer require— this is used to modify thecomposer.jsonfile to declare tht another library should be included in your application.composer updateorcomposer install— this is used to actually install the required libraries into thevendordirectory. The difference betweenupdateandinstallis thatupdatewill check for a newer version of each library and install the latest version. It will then update thecomposer.lockfile to reference the latest versions. Theinstallcommand will always install the versions specified in thecomposer.lock(regardless whether they are the latest versions or not). Thecomposer installcommand should be used when you want to avoid updates to the libraries.
Composer works with packages from the Packagist library directory.
Task – Play with composer
Go to Packagist and search for the Latte library. You will use it later in you project.
Review the available information about the library. Create an empty directory and try to install the library there
as if it was a new project you’re working on.
You should find the latte/latte library. There you can see the command to install
the library: composer require latte/latte. Go to an empty directory and run it from command line.
When the command finishes, the current directory should contain the composer.json, composer.lock
files and the vendor directory. The composer.json files should be similar to this:
{
    "require": {
        "latte/latte": "^2.4"
    }
}
The vendor directory should contain the composer and latte subdirectories (these are the actual libraries)
and an autoload.php file. The autoload.php file makes the libraries available in your PHP script.
Therefore to use any of the installed libraries in your PHP script, all you need to do is
write require "vendor/autoload.php"; in the PHP script (see require).
The practical implications are that you need to include the composer.json and composer.lock files with your
application code. This means they should be versioned in Git. On the other hand the vendor directory
contains nothing precious — it can always be recreated by running composer install. This means that the
the vendor directory is never versioned in Git and often omitted when copying (or backing up) the application.
It is not necessary to understand the ins and outs of the Composer tool and package management now. However you should
be aware what the command composer install does and what the vendor and composer.json files contain.
Environment
One of the files present in the project skeleton is the file .env.example. The contents of the file are similar to this:
DB_TYPE=pgsql
DB_HOST=localhost
DB_USER=xlogin
DB_PASS=db_password
DB_NAME=xlogin
This file defines parameters for your application. Currently these are only the database
credentials. For the file to become active you have to make a copy and name it .env.
In the .env file you should enter the database credentials. The .env file
is not part of a git repository and it should never by part of it. Because it contains
the username and the password to your database (and your repository is probably public,
which would make the credentials visible to everyone). Therefore, take care not to modify
the .env.example file and not to add the .env file to the git repository.
For obtaining the database credentials, see the technical introduction.
Working with Slim
Now that your application is set-up, you can start playing with it. You need to upload the application to a
web server and test if it works. Remember that the entry-point of the application is in the public directory. That means that for testing, you need to include that in the URL.
Common Problems — Not Found
If visiting the public/ directory gives you a 404 Not Found error. Try visiting public/js/jquery.js, if
that too gives you a not found error, you probably uploaded the application in a wrong directory.
If the second link works, but the first one (public/) does not, chances are that the
redirection rules might be messed up. This commonly happens when the application is not
placed in the root of the web server.
For example, if the complete URL you’re using is https://example.com/~username/devel/public/, then you may need to
edit the .htaccess file in the public folder and modify the line:
# RewriteBase /
to
RewriteBase /~username/devel/public/
Don’t forget to upload the modified .htaccess file to the web server!
Common Problems — Slim Application Error
If you receive a Slim application error, you definitely got further. This means that the application started, but had to terminate because something is not right. You have to read the details and message and see what it says.
Permission Problem
Message: Unable to create file '/home/src/../cache/index.latte--acd74af49a.php.lock'. fopen(/home/src/../cache/index.latte--acd74af49a.php.lock): failed to open stream: Permission denied
The above message (and similar messages) mean that a directory is not writable by the
application. There are two directories to which the application writes — cache and logs.
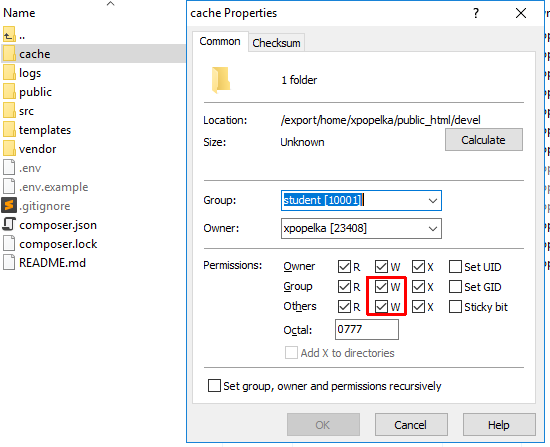
You have to set their permissions to 0777. Either log on to the
server and issue the commands:
chmod 0777 cache
chmod 0777 logs
Or if you are using a FTP/SCP client, you can set the directory permissions there as well. For example in theWinScp it is in context menu and “Properties” (F9 key):
Setting the directory permissions to 0777 may be unnecessarily permissive. However, it is
always the first step. Once you get the application working, you can start playing with it.
The exact permissions required depend on the exact configuration
of the web server you are using.
Missing Environment File
This situation is announced by an error similar to this:
Fatal error: Uncaught exception 'Dotenv\Exception\InvalidPathException' with message 'Unable to read the environment file at /home/devel/src/../.env.' in /home/vendor/vlucas/phpdotenv/src/Loader.php:75 Stack trace: #0 /home/vendor/vlucas/phpdotenv/src/Loader.php(52): Dotenv\Loader->ensureFileIsReadable() #1 /home/vendor/vlucas/phpdotenv/src/Dotenv.php(91): Dotenv\Loader->load() #2 /home/vendor/vlucas/phpdotenv/src/Dotenv.php(48): Dotenv\Dotenv->loadData() #3 /home/src/settings.php(4): Dotenv\Dotenv->load() #4 /home//public/index.php(17): require('/export/home/xp...') #5 {main} thrown in /home/vendor/vlucas/phpdotenv/src/Loader.php on line 75
The important part of the above message is Unable to read the environment file at /home/src/../.env.
which means that you either forgot to create the environment file (.env) or you have put it in a wrong
directory. Note that the .env file begins with a dot. This may be considered as a hidden file by
some applications.
Running
If the application throws no errors and displays the following screen, it is running.
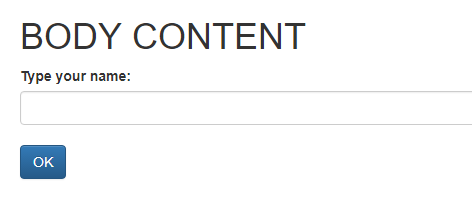
Fill something in the text field and click the “Ok” button. Nothing special happens,
but a file app.log should appear in the logs directory. The file should contain a
line similar to:
[2017-09-16 23:18:40] slim-app.INFO: Your name: test [] {"uid":"1c7510e"}
If it does, it means that the application is working, the form is being sent and also that the application can send
messages to the internal log (logs/app.log). That means you were successful!
Summary
You have initialized your project from a project skeleton. You should now have a very basic working application. While it doesn’t do much yet, it makes way for the more complicated stuff. You should have a basic understanding of the project structure and the Composer tool. You should know that there are thousands of available packages and how you can install them in your application. Do not worry if you don’t understand everything. Things will become more clear when you start using them!
New Concepts and Terms
- Composer
- vendor directory
- packages
- Slim
- environment file
Control question
- Why use environment file?
- What configurations should you put into environment file?
- Does environment file get stored into VCS (Git)?
- Where does Composer download the packages from?
- How does Composer know which packages and their versions to download?
- Should you keep vendor folder in VSC (Git)?
- Is it meaningful to edit files in vendor directory?
- Why use a framework?